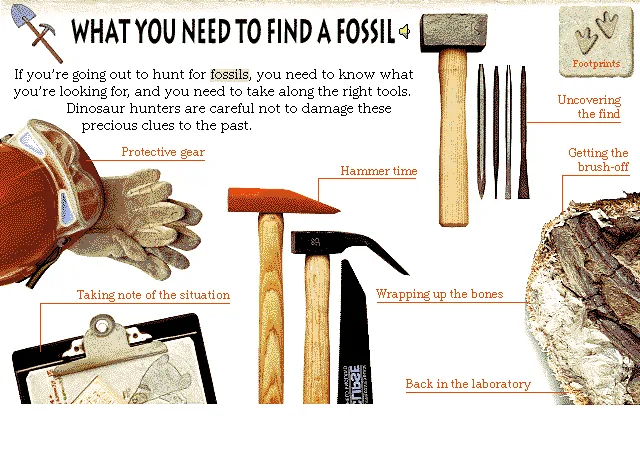
Microsoft Dinosaurs
What You Need to Find a Fossil

Discover the tools and tricks paleontologists use to dig up dinosaur bones without breaking them!

If you're going out to hunt for fossils, you need to know what you're looking for, and you need to take along the right tools. Dinosaur hunters are careful not to damage these precious clues to the past.

Explore

Hammer Time

Hammer Time

Paleontologists use dynamite, crowbars, and a variety of hammers to split fossil-bearing rock. Hammers vary from huge, heavy sledge hammers that need a lot of muscles to swing them to tiny, precision instruments. Straight-edged hammers are good for splitting hard rock. Curved-headed hammers work well for breaking up rock into small chunks and clearing away softer materials such as clay. Flat-sided lump hammers are used to drive chisels into the rock.

Protective Gear

Protective Gear

Fossils are frequently found in very rugged locations, such as windblown deserts or steep mountain slopes. Not only do fossil detectives have to contend with the weather and difficult locations, but also, digging out fossils can be dangerous work, so it pays to wear the proper protective gear. Workers wear gloves to protect their hands as they hammer and chisel away rock. Goggles protect their eyes from flying rock splinters. And it's always a good idea to wear a hard hat, especially if the work takes place in a cliff face, where rocks might unexpectedly tumble down on the diggers.

Uncovering the Find

Uncovering the Find

After signs of a fossil are detected on the ground surface, paleontologists analyze the surrounding rock material and determine what tools are needed. If the surrounding sediment is not too hard, workers use shovels to dig slowly and carefully around a fossil, removing plants, loose pebbles, and rock fragments. If the area surrounding the fossil is solid rock, it's time to bring out the rock hammers and hack away. In really tough situations, explosives such as dynamite are used to blast free a block of stone over a fossil. Workers map the location of each bone they find to learn the circumstances of a dinosaur's death and burial. They then photograph any piece that looks as though it might be a fossil, preparing their discoveries for later study in the laboratory.

Wrapping Up the Bones

Wrapping Up the Bones

Dinosaur fossils are millions of years old. It would be a shame to damage these precious pieces while transporting them to the lab, so workers take great care to protect them. All fossils may be hardened with special glues in the field. Small fossil sections are placed in padded boxes or bags. Larger sections, although they may appear hard, are just as delicate, so these are wrapped in plaster "jackets." When one side of the plastered fossil is dry, they turn over the fossil and wrap the other side. After the plaster dries all around, the fossil can be safely moved.

Getting the Brush-Off

Getting the Brush-Off

In the field or in the lab, most paleontologists have brushes in their pockets. It's important to preserve the tiniest details of every fossil, so paleontologists use brushes instead of sharp tools to clear away the final layers of dust and rock chips from the fossil. After the fossil is fully exposed, glue or some other penetrating hardener is often painted over it to secure any loose fragments and strengthen the bone.

Taking Note of the Situation

Taking Note of the Situation

Working on a dinosaur dig is like being a detective at the scene of a crime. Not only do the workers need to collect all the evidence, they also have to draw a complete picture of the location. With a clipboard and a measuring tape in hand, they take notes and sketch the position and appearance of the fossil, and draw a detailed map of the site. This information is vital when trying to assemble a skeleton later in the laboratory. Without these records, it would frequently be impossible to determine important details such as whether a bone fragment was part of a rib, or whether a toe bone belonged to a front or back foot.

Back in the Laboratory

Back in the Laboratory

After fossil pieces are extracted and repaired, they must be cleaned and studied. The preparation process is time consuming: it can take two years to clean a single bone! Pieces of a find are usually photographed for a catalog. Sometimes they are also illustrated from various angles by an expert scientific illustrator—a good line drawing can better emphasize the details that a camera might miss and may also reproduce more clearly in books and scientific journals. Using wire and sometimes even steel rods and welding torches, the fossils are then reassembled as they would be in life. Years of fossil preparation and study can lead to a skeleton, ready for display. For a more lifelike representation, scientific sculptors enter into the process at this point, adding muscles and skin to recreate a dinosaur.

Explore more

Source: Microsoft Dinosaurs (1993) CD-ROM. Text liberated from original screen art; images & audio restored from disc. Original media is Microsoft/supplier copyright — non-commercial educational preservation. Credits & Acknowledgements